Sunday, December 9, 2012

Eat Like a Pilgrim

I just found these pictures on our camera and wanted to share them for a future Thanksgiving activity!  We went to Eat Like a Pilgrim at Thanksgiving Point in November.  It was a bit pricey, but really fun!  It would be pretty easy to do an "Eat Like a Pilgrim" on your own.

We ate at long tables and sat on benches.  We used a knife and a spoon.  We draped our gigantic napkins over our shoulders.  We had corn mush, yam mush/pudding, salad with vinegar and oil in separate containers, sourdough bread with butter, apple cider (diluted) turkey, pork, and the choice of duck, eel, or clams.  We could also try hard tack (like thick saltines) and parched corn (corn nuts). The kosher salt was in a bowl to sprinkle on your food.


 There were people on the stage telling us how to eat and doing other fun things like going "hunting" to get more food for the party.  Before the dinner, there were games to play, and after, there was dancing.  


That is my eel.  It was very fishy.  Well, it was Uncle Mark's eel, he gave it to me when he'd had enough.  The duck was quite good, though.  I wouldn't touch the slimy clams! 


The "Indians" bid us farewell.

Monday, November 26, 2012

Peace, Joy, and Love Bird Ornaments


Last year I saw the most darling bird ornaments at Chocolate on My Cranium and knew I had to make them this year.  They are turning out GREAT!!  Thanks, Chocolate!

She put the names of Christ on the birds, which I intended to, until I realized my birds were too small!  Oh well.


Saturday, November 10, 2012

Craft Blogs


I think this is my favorite one . . . EVER.

Sunday, October 7, 2012

Temple Hankies

I have been so NOT crafty lately, but today during Conference, I wanted to stitch the kids' names on their temple handkerchiefs (I did not do the edging on these, though).  I think they turned out pretty well.


Tuesday, August 14, 2012

And yet, another layered skirt

I made this one for my niece. Isn't she cute?


From MADE.

Friday, July 20, 2012

Another Layered Skirt

I've had this one cut out for a while, but haven't taken the time to sew it together.  It took me all day yesterday.  If you have the time, though, I'm thinking it's about a 2 hour project.  I think it might have looked cuter with 4 tiers, rather than 3.  Here's the tutorial from Made.


Thursday, July 19, 2012

Layered Skirt


I found this cute tutorial on MADE for a layered skirt.  Turned out really well.  I'll make another.

Monday, July 16, 2012

Easy Gored Skirt Tutorial

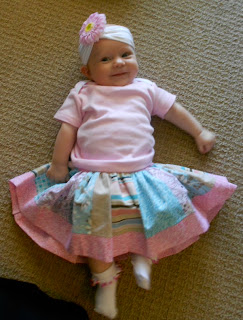
I thought I'd make my daughter a gored skirt, too, just based on measurements -- and it worked!  So, here's a tutorial.  It's probably not perfect, so feel free to leave any helpful comments if you give it a try.

For your fabric width:
1.  Measure around your hips (widest point around your bum -- your skirt needs to fit over this widest point) =  _____"
2.  Add 2"for give = _____"
3.  Add an inch for each seam (# of main panels, in my case 6") = _____"  (I ended up doing 1/2" approx. seams, so that really only adds 3" extra in addition to my extra 2" for a total of 5" wider than the hips.  This left a good amount of wiggle room, but not too much.)

**So, for my daughter's skirt, I took her waist measurement of 25", added 2", then added 6".  This gave me a width of 33".

For your skirt length:
4.  Measure from your waist to however long you want your skirt to land = _____"
5.  Add 1.25" for the waistband = _____"
6.  Add 3/4" for the hem = _____"

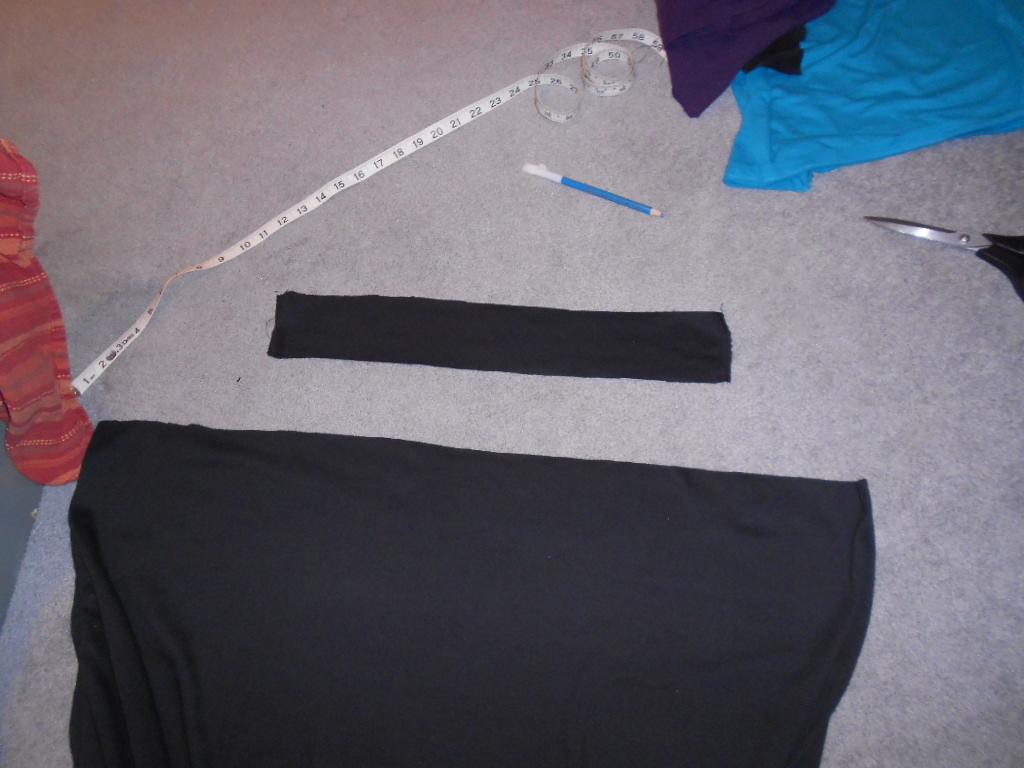
7.  Cut out your skirt fabric according to the above width and length.

8.  It's easiest if you are doing an even number of panels in your skirt.  You could divide the width by the number of desired panels and measure them out and cut them, but I just folded my fabric in half and then thirds and then cut it down the folds to get my 6 panels.


 9.  Next, I cut some long triangles to fit between the panels.  I didn't do any magic math or anything, just hoped it would work.  The width at the bottom of the triangle is just a bit smaller than than the width of the rectangles.  I think, though, I did try to get the triangles to end right up about the height of the pubic bone.


10.  Now, sew in the triangles.  Just place a triangle and a rectangle, right sides together, sew, then zig zag (or surge it together if you have one!).  Then, place a second rectangle over the combined triangle/rectangle piece and sew that together the same way, but securing all the way to the top of the rectangles.  It's a little tricky lining up that second rectangle piece as to not let the tip of the triangle poke through wrong.  You may have to pick out a time or two before you get used to it.  Continue piecing together all the way around.


11.  I realized that my skirt was going to end up a little short, so I added enough fabric at the top for the waistband casing and a couple more inches.  To make the casing for your elastic, either fold the fabric under 1/4" and then another 1 1/16" (or just a little bigger than the width of your elastic) or zigzag your edge then fold it down and stich all the way around a little wider than the width of your elastic leaving an opening to feed your elastic through with a safety pin.


12.  Feed your elastic through using a safety pin.  I like to cut my elastic an inch or two smaller than the waist size. I  used Wal-Mart elastic, so it is kind of stretchy, so 23" for the elastic seemed good.  Stich the waistband casing closed.


13.  Hem the bottom of the skirt.  I just folded the bottom under approximately 1/4" and then again 1/2" and stitched.


14.  Let your little girl wear it with something that doesn't really match!

Saturday, July 14, 2012

Patriotic Skirt


My SIL gave us the darling skirt in the top picture for the baby.  I thought I'd copy the idea into a patriotic skirt.  I think it turned out really cute.  We gave it away for a b-day present.

Friday, June 29, 2012

Cut-offs to Skirt


I cut off the lower half of some of my daughter's jeans that had holes in them and hemmed them into shorts.  The bottom parts that I'd cut off looked like they'd make a cute skirt for little sister!  I also added birdie shorts underneath!  She loves her new skirt!

Sunday, June 10, 2012

Patriotic Infant Peasant Dress

 I managed to make this little dress from Sew Much Ado yesterday (free pattern!!).  Took around an hour.  I think it turned out cute.  Now we can all match for Independence day.

Friday, June 8, 2012

Gored Skirt

I got yards and yards and yards of this fabric from my aunt.  Last year, I made my girls some patriotic dresses with it:


I never got around to making me something, though, until now.

As I searched for a "patriotic skirt" for ideas, I came across a "propaganda dress":


I searched for other 1940s dresses and found a cute wrap around dress:


I tried to make the dress over the last couple days by adjusting a pattern I had, but didn't have luck.  I gave up and took it apart and just made the skirt.

I've never found making a gored skirt quite so simple!  I didn't use a pattern, and I think it was easier.  I may have to make a tutorial. The skirt turned out longer than I wanted, and maybe too much width, but I'll work out the kinks.  I entered it into the Crafterhours skirt week contest.  Funny because the contest ends tonight and I made the skirt today.  I don't think it's that cute, but it's fun that the girls and I match.

Somehow I made the above skirt just a bit bigger than my liking.  I pulled out a couple panels and it fits much better!

Monday, April 2, 2012

Easter Activity

So, this isn't a craft, but it was a fun Easter activity for Family Home Evening tonight.

My husband began by talking about Easter and the resurrection, where Christ was crucified, where His body was put when He died, etc.  Then my husband asked the kids about who came to the tomb and what happened -- Jesus wasn't there.

To demonstrate, after we reviewed the story, my husband pulled out a paper sack to represent the tomb and asked one of our daughters to put a Lego guy in it to represent Jesus (I hope that's not sacrilegious) and roll up the bag.


When it came time to open the bag (when Mary came), Jesus was not there!
You should have seen the look on the kids' faces!  Where did the Lego guy go?  They were pretty amazed. 

Well, it's pretty obvious to us, I'm sure, but just in case to make it clear, he previously cut a hole in the bottom of the bag and grabbed the Lego guy out as our daughter rolled up the bag.  He hid the Lego guy in his hand until it was time to be "resurrected."


You'd think someone would have taught this part of the Easter story like this, so maybe you've never thought of it either.

After this activity, we needed to fill some Easter eggs for an activity on Friday.  We asked the kids what Easter eggs have to do with the resurrection of Christ.  Our 8 year old son was quick to share an answer.  He said that the Easter egg is like the tomb, and when you open it up, the candy inside is like Jesus coming out of the tomb.  That's good, I'm glad he can put pagan with Christian.  We may as well think of it like that these days.

Then we asked, so what do Easter bunnies have to do with Easter?  Our 8 year old summarized a story he'd heard at the school library about some witch and some birds and the witch turned the birds into bunnies and that's why Easter bunnies lay eggs.  It was pretty funny.  He knew it wasn't real, but it was the best explanation as to why in the world Easter bunnies lay eggs.  I'll take the Cadbury type any day.

Then we had fun telling the kids that, really, the bunnies and eggs have more to do with Spring, which can very well remind us of Easter, but rather than focusing on them, we try and remember the resurrection of our Savior.

Wednesday, February 1, 2012

Kite Bag

One of the first times I conversed with the guy I would later marry, he was talking about his kite and his kite gloves.  Kite gloves?!  Yeah, kite gloves.  I totally made fun of him for his kite gloves.  Like who has those?

I should have bit my tongue because I just made him a kite bag to carry his kites.  Yes, kites.  Plural.

These aren't just your run of the mill crapperware*, I mean kites, these are really, really nice ones.

Some people are really into these things, and he's gotten more into them since he graduated from college for the 2nd time.

Kite bags online were running $130-$150, and we figured I could probably make something that would work just fine.  It's interesting watching my sewing skills* evolve over the years.  When we were first married I was annoyed that I didn't have a sewing machine because I wanted to do simple things like hem pants.  Once I got a machine, I realized I could do useful stuff like make humanitarian baby blankets and window treatments.  Then, I got all historical and started making re-enactment clothing.  Now, I've had my hand at maternity-wear.  Who knows where your sewing will take you?

I thought of making this into a tutorial, but since we didn't know what we were doing, I didn't bother. Hopefully, though, if you want to make your own, you can get the concept and go for it.

It was slightly difficult working on this project, as Evan did the design rather than me.  It's a little hard interpreting what exactly the other person wants when you're using slightly different terms to explain the same thing.  The biggest trick was figuring out the buckle/handle system.  We had to fix it 4 times!  We did put a dowel in the edge by the handle so it won't gape open when he carries it.

 
There's room on the left for another big kite, or we can divide the pocket for two more smaller kites.  On the right at the top is a n open pocket, and below that is a pocket with a top flap.  We didn't put Velcro on the flap, but we could.  Another option would be to make a zippered pocket.

You can see the bottom pocket with the flap in this picture.  You can see the buckles out to the side.  Most of the strapping/buckles we cut off of old backpacks (even bought a new bag at the DI to use some of its "hardware."  We also bought some of the notions at the fabric store, but it was way cheaper to buy a bag at the 
DI and cut it apart.

All rolled up with adjustable straps and handles.

He can carry it down or over the shoulder.  He thought maybe we should have made it with camouflage fabric so people would think it was a gun.

In the end, he said, "Wow!  This turned out better than I thought it would!"  (What?  You doubt my sewing skills? ;) )  He also said, "I just can't believe you can make stuff like this without a factory full of Chinese immigrants!"

Total cost around $30.
Total time 5-6 hours.  To make another would take probably less than half the time.


*Have you seen Napoleon Dynamite?

Thursday, January 5, 2012

McCall's 6074 -- as maternity

I've really had fun with this dress, and I'm starting to get the hang of sewing on knits.  It's been decades.  I raised the neckline and added sleeves.  I've grown so much I didn't even add the elastic in the front, but grabbed a scrap of fabric for an optional belt.  Maybe after the baby, I can add the elastic in the front.


I was also looking around for more maternity ideas and found these:
http://doityourselfdivas.blogspot.com/2011/10/diy-perfect-maternity-dress-revamped.html
http://www.luvinthemommyhood.com/2011/05/maternity-sewing-tutorials-roundup-2011.html#comment-form
http://www.luvinthemommyhood.com/2010/03/maternity-sewing-tutorial-roundup.html

By the way, I used the concepts in The Dressmaker's Guide by Elizabeth Stewart Clark to design my sleeves -- who said you only have to use her book for historic clothing?

Also, Prudent Baby offers some helpful advice for sewing on knits.

Tuesday, January 3, 2012

T-Shirt to Maternity Dress

I told my mom I was going to turn a t-shirt into a maternity dress tonight and I think she thought I was nuts. I believe she was thinking of the t-shirt dresses they make to send to 3rd world countries.

I've been wanting to try this idea, but didn't have a shirt to use. Then I realized this shirt had holes around the stomach -- probably from me trying to zip my fleece jacket up over my big belly.

I went to the fabric store, bought some black fabric for the waistband and skirt, and some purple to blend with the shirt.  The purples aren't quite the same, but with the black in the middle, you can't tell.

I don't have a serger, but that would have been immensely helpful with this project. If I do much more with knits, I might have to start looking into one.

First, I sewed the purple strip onto the black strip at the bottom.  Then I folded the whole thing in half and sewed it to make a tube.  I planned to put the seam in the center back.

Then I found a shirt with an empire waist and cut my old shirt at about the same level.

Then, I decided I wanted a waistband and cut about 3" off the top of the skirt.   Then, I evenly gathered the skirt into the waistband and sewed the skirt to the top.

I'll hem it tomorrow.  I've noticed that these long dresses are in.  I'm not so sure how I feel about that because they are so incredibly impractical.  At least they're not as full as other long dresses I've worn.