Wednesday, December 15, 2010

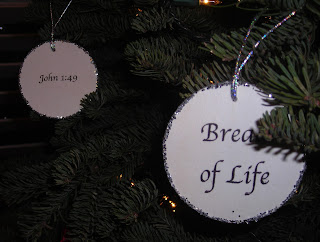
Christmas Scripture Ornaments


 I saw some ideas for a Scripture Christmas Tree on Pickup Some Creativity:  http://pickupsomecreativity.blogspot.com/2010/12/scripture-christmas-tree.html.

Then, I saw a Pottery Barn knockoff ornamet on Crafterhours:  http://crafterhours.blogspot.com/2010/12/pb-knock-off-glitzy-ornaments.html


I thought I'd combine the two ideas.


I bought a silver plating pen, which didn't work at all -- and I actually do have pretty good penmanship; it just wouldn't work right -- these ended up looking like a 2nd grader made them.  Ugggly!


Then I tried printing on tissue paper, but for some reason, my ink turned out purple.  Waste!


Finally I got it right!  Phew!


I think I do want to add a cute little silver ornament on them like on the Crafterhours site.

Sunday, November 14, 2010

Hats and Scarves

I had my Cub Scouts make some knotted-end scarves for an activity the other day.  When my kids saw them, of course, they wanted to make them, too.  We went off to the fabric store, and this is what we came up with.  My boy did all his own knots.

The hats are just 1/2 yard tall cut to the circumference of the head for the width plus 1".  I made that piece into a tube with a 1/2" seam.  Then I folded under and hemmed (with a zig-zag) one end up 3 3/4".  Then we snipped the top end down a few inches about 3/4" apart and tied the top with a skinny scrap.

The scarves are merely an 8" strip cut the full width of the fleece.  I didn't hem the sides or anything.  Then the boys cut about 4" deep into the fabric about 3/4" apart and tied a knot on each little strip.  You could use a 16" wide piece, make one seam to turn the fabric into a really long tube, turn it, then cut your ends and tie your front and back together for a double thickness scarf.

Circle Skirts

Double half circle skirt

Full circle skirt


I've also had some fun making circle and half-circle skirts for my daughter.  I was trying to get the skirt right for my "late Halloween costume" and thought I'd start small.

We have all this awesome Christmas fabric from my aunt who moved away, and I thought it would make cute Christmas skirts.

After I experimented with the first couple of skirts, I saw a link to this awesome formula from Madehttp://www.dana-made-it.com/2008/07/tutorial-circle-skirt.html.

If Made ever disappears, here are her further instructions:
Let me break it down a little more:
* Measure your waist
* Add two inches to that number. You need these extra two inches so the fabric has "give" and will actually "stretch" when it's sewn on to the elastic. It will create a very subtle gather to the skirt but will make it easier to get the skirt on and off. This will make more sense as you sew.
* Take your "waist + 2 inches" measurement and divide it by 6.28, and you have the radius!
* In Lucy's case....
Her waist is 19 inches, plus 2 inches = 21 inches divided by 6.28 = 3.3 inch radius.
Because I'm actually using a waistband and not elastic, I think I'll need to use hip rather than waist measurements (so it will fit over the hips).

I like cutting my circle using my folding technique as mentioned in my bonnet tutorial.  Bingo!  No pattern needed.

This really is so easy -- especially when you do a rolled hem with the machine.

Saturday, November 6, 2010

My Late Halloween Costume

For Christmas this year, my husband's work is having a 1920s themed party.  I thought, Great!  Now I can make a 1920s dress and use it for Halloween, too.  I bought fabric, a pattern, altered the pattern, made a skirt (you can see why). . .  and I ended up looking like a giant green grasshopper (I really should share a picture.  It was really awful.  It looked like a 1980s bridesmaid dress).

So, I gave up on the idea for Halloween, went back to the fabric store, used a smaller pattern size, designed a new skirt and this is the result.
I wish I would have made the bodice 1 - 2" longer, but too late now.

The skirt is slightly boring, but I'm too afraid to make the front shorter than the back.

Past Patterns #503
I'm also not sure how I like my two tiers, and I think it looks too long in the pictures (or maybe I'm just too short).  Maybe I can shorten the longer skirt.  Luckily I can bunch the short tier up into what looks like a belt.  My, my.  How versatile.

More inspiration:

Can't remember where I got this image!


Past Patterns Ladies' Evening Dress
I was afraid my fabric would be horribly slippery.  In fact, the lady at the fabric store said I'd probably need to pin it every inch!  However, it was actually quite easy to sew on, and it is so thin I was able to do a rolled hem. I'm still trying to perfect my technique, but for a costume, I'm okay with it.  I'll probably embellish the scarf a little and add some ribbon to the bottom of the sleeves.

Thursday, October 21, 2010

Halloween Costumes


I know I already made my daughter an Alice costume, but looks like we're going with Popeye, Olive Oyl, and Sweet Pea instead.

I used this idea for the Olive Oyl collar:  http://blueeyedfreckle.blogspot.com/2010/09/tutorial-17th-century-ruffle-collar.html.  The ribbon stuff I used on the sleeves would have been too stiff for a collar. I originally bought it for the collar, forgetting I needed ruffles on the sleeves, too, so it actually worked out.  Here's a gross tidbit: the knit fabric I used for the collar was from the sides of the In-N-Out shirt I took in.  Ok, that's not so bad, but I really don't think I washed the shirt before I took it in; therefore, the collar was the sides of my sweaty workout shirt!!!!!  I haven't told anyone that . . . yet!

She noticed on the movie cover that Olive Oyl had red earrings; hence, non-matching buttons on thread around her ears.

She also wanted black hair, so we splurged on $5 black hair spray, which, I might add, put a nice black ring around the bathtub when we washed her hair out!

I learned how to make the sailor collar here:  http://www.godsavethequeenfashions.com/Making_a_Sailor_Collar.html.  It turned out a little shorter in front than I expected, but I was able to still get it to work without re-making the front of the shirt.  I think I can do a better job next time.

I can't remember where I read to get some stockings and stuff them for Popeye arms.  I found some microfiber (I think) knee-highs that I cut the toes off of.  I wrapped quilt batting around his arms, then put the socks over and tucked the ends under.


I used a $1 sale baby costume pattern for the red Sweet Pea outfit and snagged the collar off of a 30+ year old sailor dress of mine (it was so conveniently buttoned on).  I wanted to make a new collar for the baby, but I think I've run out of steam.  I like the red suit because we can use it for Christmas, too!

Made a new hat!  I think I feel a tutorial coming on!
Wednesday, October 13, 2010

4th of July Cake

For combined YW/YM's tonight, they had a cake decorating contest.  My husband's teachers were given the 4th of July theme.  This is what they came up with.  The boys actually frosted the cake themselves.  Evan brought all the printouts to cut out and stick on.  They put pictures of the democratic presidents on the left.

It had sparklers on the top; hence, the burn marks.  They also played the national anthem while the cakes were being judged.  They only got 3rd place!  (out of 6).   Rip off, they said. 

Wednesday, October 6, 2010

Photo Blocks


Made a new one of these at RS last night for the baby to match the ones for the older kids.


What I don't like about canning . . .

Thursday, September 30, 2010

Another resized shirt!

Many years ago when I had a job (you know, one not at home), I helped out with a conference for LDS Employment in Las Vegas.  Some of us were given In-N-Out shirts for being there.  Mine was huge.  I've used it for exercise and for something that fits while pregnant.

Since I've been resizing shirts lately, I thought I'd resize this one after a Shade shirt that I have.  Not that I plan on wearing Shade shirts very much, and not that I plan on wearing an In-N-Out shirt anywhere (especially because there's a big controversy at my husband's office as to whether In-N-Out or 5 Guys is better.  I'm thinking 5 Guys, but I haven't been to In-N-Out for a really, really long time). 

I cut this one a little bigger than my Shade shirt, and it's still a little tight in the chest -- tighter than I like, but luckily I'll only be exercising in it!

Now I can start shrinking shirts that I actually like -- like my BYU shirt.

Wednesday, September 22, 2010

Reusable Swiffer Duster

I love Sew Much Ado.  I made this Swiffer Duster with her tutorial!  So easy and fun!  This would be a great RS craft night project.

http://sewmuchado.blogspot.com/2010/02/tutorial-reusable-swiffer-duster-cloths.html

Simple Dutch Oven Bag Tutorial


1.  Use your lid to measure for the bottom of your bag.  Cut a circle an inch or so bigger than your lid all the way around.

2  Cut a strip about twice the height of your Dutch oven and long.  I thought mine needed to be 34" long, but it really needed to be a little less.  It's better a little longer than shorter because you can always make it a little smaller very easily by cutting.  Geometry wold have come in handy here.
 

3. Pin the bottom to the side, straight stitch, then zig-zag your edge.

I sewed my strip into a tube, then attached it to my bottom piece.  In retrospect, since my length measurement was a guess anyway, I shouldn't have made the tube.  I should have pinned my strip to the bottom all the way around, then stitched my ends together at the appropriate place for a perfect fit.


4.  Zig-zag your top edge.

5.  Fold down your top edge all the way around and stitch down.  I felt it was too bulky to fold under; that's why I zig-zagged.  I folded this one down 3/4".  You could do 1", or whatever.

6.  Drop your Dutch oven in to see where to secure the belt.

7.  Secure with pins.  Take out your Dutch oven.  Straight stitch securely!


8.  Put the Dutch oven back in.  Fold up & secure.

9.  Cute as a button!

You could get really creative and use some old pockets on the sides, or cut off belt loops and use them to secure the belts (strap/handle), rather than just tacking them down.  I just didn't want to take the time!

Took less than an hour.

Tuesday, September 21, 2010

Dutch Oven Carrying/Protective Case

I've been thinking for a while that I ought to make some sort of carrying/protective case for our Dutch ovens.  I have several pairs of old jeans down the basement and thought those would be the perfect fabric.

At first I thought I'd do a drawstring in the top, then I realized an old belt, tacked down, would be even better!


Maybe I can come up with a tutorial as I have to make another carrier for our 2nd Dutch oven.

Thursday, September 9, 2010

Re-fitted Family Reunion T-Shirt

I took this large family reunion t-shirt and cut and sewed it down to fit!  I still want to adjust the sleeves a little, but I'm so glad it (mostly) worked!  Now I can do it to some other very large t-shirts!

Saturday, September 4, 2010

A Girl Like Alice


After watching the new Alice movie recently, I was looking at one of my blue little Pioneer dresses.  I thought, that is the perfect little Alice dress! I just went with the Disney cartoon costume, though.

Here's the transformation: